Wednesday, June 29, 2011

Tuesday, June 21, 2011
Ipod Icons Evaluation.

For the ipod research we had to make 4 of our own icons that would be suitable to go on the ipod, basically i decided to go with 4 game icons which are below on this blog post.


 These are the 4 icons i created to go on the
  ipod.
ipod.This below is a professional example of an ipod icon.


this is my finished ipod with my icons on it.
to make all my original sketches i first drew them then i scanned them in to the computer where i then edited them on photoshop to make the finished designs, i made them better quality by using photoshop, to improve them i would take a little more time to make the detail better and make a better end product but overall for the time i had to finish these ipod icons i think i have done well.
Tuesday, June 14, 2011
Evaluation of comic strip
 This is my finished project for my comic that i had to do you cant see it very clearly on this picture but you can make it out enough to understand what's going on, i first thought of ideas on what i could do for my comic for a game and i decided to make it about south park because its my favourite tv programme.
Thursday, June 9, 2011
Reflection of 3d animation
My idea for the animation was a simply one, a ball that goes around a obstruction course and it did meet my original intentions that I planned it out to be. This work compared to my final design Is very good I think because I didn’t know how to do animation before on 3D max and it’s the first proper animation I have done and I think I’ve done pretty well.
Compared to professional examples my work is still a long way off that standard but hopefully as the time goes by at college I will learn new skills and progress to a better standard of work.
I think it went really well because I didn’t encounter many problems and it was a simple and quite easily made design. I faced one difficulty during the animation which was when I tried to do a see-saw as the ball went over I wanted it to go down as it goes past half way but the animation made the seesaw move throughout the animation which I did not want to happen but to overcome this problem I found that I just needed to delete the first frame of the animation so it didn’t animate throughout the whole animation but only when I wanted it to.
I think the timescale for this project was reasonable and an achievable target to finish the project, I have learned a few new things in 3D max during this project which will help me in the future.
Compared to professional examples my work is still a long way off that standard but hopefully as the time goes by at college I will learn new skills and progress to a better standard of work.
I think it went really well because I didn’t encounter many problems and it was a simple and quite easily made design. I faced one difficulty during the animation which was when I tried to do a see-saw as the ball went over I wanted it to go down as it goes past half way but the animation made the seesaw move throughout the animation which I did not want to happen but to overcome this problem I found that I just needed to delete the first frame of the animation so it didn’t animate throughout the whole animation but only when I wanted it to.
I think the timescale for this project was reasonable and an achievable target to finish the project, I have learned a few new things in 3D max during this project which will help me in the future.
Reflection of 3d model
I based my idea originally on a boat in mid-sea, My idea came from looking on the internet to decide what to make as a model and I came across a professional speedboat 3d model which inspired me to attempt to do one myself, I made a mood board of different models of boats all together to show what I intended to make which was a speedboat.
To create this boat I used primitives including boxes, planes, cylinders that I have learnt to do through this course by slowly progressing in the program and using simple shapes to form the model of the speedboat I wanted, I used a texture for the sea and the sky as my background for my boat which I wasn’t very impressed with because it didn’t look realistic enough but I did not have the knowledge to make it more realistic and I did not have the timeframe to do it.
I had a problem at one point making the railing for the front deck of my boat because I did not know how to bend the railing on top but I then researched how to bend the pole and used it to make the railing and recovered from the problem and it looked much better and like I wanted it to, Unfortunately I wasn’t that pleased with my overall finished project because it didn’t look professional enough and nothing like the professional speedboat models, I feel this was due to my lack of knowledge on certain parts of 3d max which I will definitely work on in future models, I am going to watch tutorials and learn how the program works more.
I could of made my textures for my background better if I had more time to create my own textures, The mood of the environment could have been enhanced by experimenting with some other features including the ambient, spot and raytrace lighting features.
My final design didn’t fully reach my original intentions but to a certain extent it did because I made a speedboat like I wanted to but just not as highly detailed as I imagined it to be, My final design compared to my previous work is a lot better because I’ve progressed through the year on my skills in 3d max and have learnt new things for instance duplicating, lighting, fogging and other things that helped me towards the final design which I did not know during my previous work.
My final design is still a long way off professional examples because I still have a lot to learn about the 3D world and the software to get to that standard of work. A lot of things went pretty well during the project I thought it went a lot smoother than I thought it would be but also I didn’t think it would be as hard as it was to make the quality of the product very good like professional examples.
A difficulty I faced was with the bunker on top of the boat where it went wrong with editing the mesh I ruined the vertex’s on it and it made it look unlike the shape I wanted it to. I overcame this by taking the time to sort the vertex’s out one by one until it looked presentable. I think the timescale and targets of the project were achievable and I had plenty of time to finish it.
In this project I have learned new skills in 3d max but I have also learned that I have a long way to go and a lot more to learn yet before I can do brilliant quality work and that I may have to watch some 3D max tutorials.
To create this boat I used primitives including boxes, planes, cylinders that I have learnt to do through this course by slowly progressing in the program and using simple shapes to form the model of the speedboat I wanted, I used a texture for the sea and the sky as my background for my boat which I wasn’t very impressed with because it didn’t look realistic enough but I did not have the knowledge to make it more realistic and I did not have the timeframe to do it.
I had a problem at one point making the railing for the front deck of my boat because I did not know how to bend the railing on top but I then researched how to bend the pole and used it to make the railing and recovered from the problem and it looked much better and like I wanted it to, Unfortunately I wasn’t that pleased with my overall finished project because it didn’t look professional enough and nothing like the professional speedboat models, I feel this was due to my lack of knowledge on certain parts of 3d max which I will definitely work on in future models, I am going to watch tutorials and learn how the program works more.
I could of made my textures for my background better if I had more time to create my own textures, The mood of the environment could have been enhanced by experimenting with some other features including the ambient, spot and raytrace lighting features.
My final design didn’t fully reach my original intentions but to a certain extent it did because I made a speedboat like I wanted to but just not as highly detailed as I imagined it to be, My final design compared to my previous work is a lot better because I’ve progressed through the year on my skills in 3d max and have learnt new things for instance duplicating, lighting, fogging and other things that helped me towards the final design which I did not know during my previous work.
My final design is still a long way off professional examples because I still have a lot to learn about the 3D world and the software to get to that standard of work. A lot of things went pretty well during the project I thought it went a lot smoother than I thought it would be but also I didn’t think it would be as hard as it was to make the quality of the product very good like professional examples.
A difficulty I faced was with the bunker on top of the boat where it went wrong with editing the mesh I ruined the vertex’s on it and it made it look unlike the shape I wanted it to. I overcame this by taking the time to sort the vertex’s out one by one until it looked presentable. I think the timescale and targets of the project were achievable and I had plenty of time to finish it.
In this project I have learned new skills in 3d max but I have also learned that I have a long way to go and a lot more to learn yet before I can do brilliant quality work and that I may have to watch some 3D max tutorials.
Wednesday, June 8, 2011
Back to the blog
I haven't done the blog for a while now so i decided i needed to come back to explain some things i have done, in chris's lesson after learning the autokey button on 3d max for animating, i have animated an animation for the project which is to make an animation through 3d max, i decided to go with a ball obsticle course where i will animate it until it reaches the end which i will then try to make the ball explode when it hits the wall in the finale. i will insert a video of the animation when its fully completed.
Wednesday, April 13, 2011
3D Max Animation
Today in 3d max we did a basic animation to get used to it by using the auto key button at the bottom toolbar in 3dmax. I made a plane and shined a target spotlight onto the plane so it lights up the scene, i then created a sphere which looks like a ball.
After doing this i animated the ball bouncing by using the auto key and every 20 frames moved the ball up and down, When it hits the floor i added a squeeze modifier to the ball when it hit the floor to make it more realistic so its like real time physics. below is the video i did.
After doing this i animated the ball bouncing by using the auto key and every 20 frames moved the ball up and down, When it hits the floor i added a squeeze modifier to the ball when it hit the floor to make it more realistic so its like real time physics. below is the video i did.
Tuesday, April 12, 2011
Unit 13 Cartman
This is the task we have been asked to do Developing characters based on the work of others so i decided to chose my favourite character from south park called eric cartman and i have drawn sketches of him then put it on photoshop and develop him in a differant way by changing the colours of his clothes. here are the sketches and the finished project.

 These are the sketches.
  And this is the finished product i did on photoshop i changed the shoes,pants and the top colour of him.


 These are the sketches.
  And this is the finished product i did on photoshop i changed the shoes,pants and the top colour of him.
Thursday, March 31, 2011
Motivational Speech
On wednesday the 30th of march a motivational speaker called action jackson came into the college to motivate us about how to succeed, there were people from allsorts of courses joined in the victoria hall building for shipley college, he spoke about how he started out from not having any A levels thinking he wouldnt get anywere with a BTEC but it can be done because you end up meeting all the people who had A levels in university if you go so basically A levels dont matter you can still succeed as long as you put your mind to it. He also got people from the audience up to the front and made examples of how your mind is the only thing stopping you because you always think when you want to do something you cant for instance he did a memory game to remember all 24 pictures and your mind automatically thinks i cant remember all them but he did a way to memorise to show you that you can do it you just have to believe you can. It was a really good motivational speak and in my opinion a really good way of learning it was fun and it made you believe in yourself more and it did actually motivate you, before i came in to the motivational speach i thought it was going to be boring but it was far from it, Overall i enjoyed it and it motivated me quite abit.
Wednesday, March 16, 2011
3d max models progression continued
 This is the final image of my model with added textures and enviroments which i made to look like the sea with the sky in the background to make it look better and more realistic. to do this i made a plan at the side and underneath and added the textures on to the planes to make it like this.
 After finishing the model i decided to make a fog enviroment to make it look more realistic, to do this i went on rendering, enviroment and under atmosphere i added Volume Fog and changed the density to make it as thick as i wanted it to be.
3D max model screenshots of progress
These are progression screenshots of the process of my boat i have made on 3dmax for the assignment.
i havent got the first bit of the project where i was making the boat but i made a box and transformed it in to the shape i thought was good for a boat by editing the mesh and the vertex's to make it look the way i imagined it and wanted it to look like , Also i extruded bits of polygons in the middle to lower it and tilted in an angle to make the middle section of the boat. then i made a railing for my boat at the front of the boat which you can see from the first screenshot this is what my boat looked like at that point after a lot of work on it.
 This is the picture of the model so far from what i have describe prior to this. To get the model this far i first started off by making just a simple box and then extruded and changed the vertex's and polygons to manipulate the object to what i wanted it to look like which was a boat.
 This is after i added materials by clicking the m button in 3d max which allows you to make your own material of colours and i came up with these to combine to look like a boat.
 Then i added a little bit like a cabin on the boat this is the first bit before i transform it to what i want it to look like i decided to change it a bit from the dip in the middle of it like the first screenshot.

 Then this is just the same as the last screenshot but i have changed the colour and material of the cabin.
 This is a rendered image with the cabin transformed to how i wanted it by using vertex's i made it how i wanted it to look.
This is an image where i made the floor blue sort of like water but i intend to change this to a better enviroment.

i havent got the first bit of the project where i was making the boat but i made a box and transformed it in to the shape i thought was good for a boat by editing the mesh and the vertex's to make it look the way i imagined it and wanted it to look like , Also i extruded bits of polygons in the middle to lower it and tilted in an angle to make the middle section of the boat. then i made a railing for my boat at the front of the boat which you can see from the first screenshot this is what my boat looked like at that point after a lot of work on it.
 This is the picture of the model so far from what i have describe prior to this. To get the model this far i first started off by making just a simple box and then extruded and changed the vertex's and polygons to manipulate the object to what i wanted it to look like which was a boat.
 This is after i added materials by clicking the m button in 3d max which allows you to make your own material of colours and i came up with these to combine to look like a boat.
 Then i added a little bit like a cabin on the boat this is the first bit before i transform it to what i want it to look like i decided to change it a bit from the dip in the middle of it like the first screenshot.
 Then this is just the same as the last screenshot but i have changed the colour and material of the cabin.
 This is a rendered image with the cabin transformed to how i wanted it by using vertex's i made it how i wanted it to look.
This is an image where i made the floor blue sort of like water but i intend to change this to a better enviroment.

Thursday, March 10, 2011
Tutorial - things to do
getting a 15 minute tutorial on 3d max a week because i feel im struggeling slightly.
writing a check list of things to do on 3d max
5 a side football as motivation
writing a check list of things to do on 3d max
5 a side football as motivation
Wednesday, February 9, 2011
Project, Boat.
In 3d max we had a task first we must draw sketches of something we wanted to do preferably a vehicle so i decided to go with a speedboat which i drew from differant views like front top side views and then worked on making it in 3d max from the skills we have learnt so far. this is my finished product.
I made the boat then added a sea enviroment with the sky as a background to make it look more realistic, i found making this challenging and time consuming but also really fun and makes you feel like you have really achieved something when you finish it especially if you finish it to what you imagined it.
I made the boat then added a sea enviroment with the sky as a background to make it look more realistic, i found making this challenging and time consuming but also really fun and makes you feel like you have really achieved something when you finish it especially if you finish it to what you imagined it.

house texture practice
Today in 3d max we have learnt how to use textures and also how to use the UVW mapping on 3d max which is a complicated process its called unwrap UVW and print screened it on to photoshop and made the correct textures we wanted to make on the house after the UVW process on 3d max.
This image below is of the photoshop part i did copied roof and house textures on to the unwraped UVW printscreened on to photoshop and made these textures then saved as a JPEG and opened materials on 3d max by pressing M opening the material editor then adding a bitmap and the photoshop JPEG file i made to copy that material on to 3d max and drag it on to my product which is also below, i learnt all this today which i found to be very helpfull and i found it reasonably understandable.
I also made a background for the house so it looks like its in a field behind.

This image below is of the photoshop part i did copied roof and house textures on to the unwraped UVW printscreened on to photoshop and made these textures then saved as a JPEG and opened materials on 3d max by pressing M opening the material editor then adding a bitmap and the photoshop JPEG file i made to copy that material on to 3d max and drag it on to my product which is also below, i learnt all this today which i found to be very helpfull and i found it reasonably understandable.
I also made a background for the house so it looks like its in a field behind.


Wednesday, January 26, 2011
Corridor Using Lighting
Today in lesson we did some 3ds max and we used the lighting skills we learnt last week, we made a box and deleted the polygons from the ends and top to make it have a corridor look, we made a cylcinder into a shape of a lampshade and placed at the top of the corridor then we made a spotlight made the falloff beam and hotspot larger so it shows the sides and the lampshades we then copied the lights and made as many as we wanted to and finished it off.
This picture is the rendered view of the corridor i made with the spotlights as you can see it comes out well and showes both the sides of the corridors.

This picture is the rendered view of the corridor i made with the spotlights as you can see it comes out well and showes both the sides of the corridors.
Wednesday, January 19, 2011
Light Renders
Today in 3dmax we have learned how to do lighting, first of all you make a plane from a simple standard primitive and then you choose the 3rd tab along named "lights" and then make a target spot from above to make the light shine down on the plane, i made 4 differant renders with differant brightness/colours and im going to show them on my blog to show the work ive achieved.


Wednesday, November 10, 2010
3D Max 10/11/2010
Today in 3d max we learnt further skills, such as learning to duplicate the object you are making in this case i made a spaceship by making a box then highlighting the side polygons and removing them from the side so it is like a half box type thing, then copied it by holding down the shift key then changing it from copy to instance so whatever you do to one side happens to the other side of the box, you keep them both seperate then you do the alterations needed until you are happy with your product.
Then when you are happy with the side of the spaceship you are working on you put them together click attach on the right menu so that it is joint as one object so you can use editable mesh to change the polygons right in the middle of both so that its fully one joint product. I dont have a picture of my product because i saved it but it didnt save for some reason.
Then when you are happy with the side of the spaceship you are working on you put them together click attach on the right menu so that it is joint as one object so you can use editable mesh to change the polygons right in the middle of both so that its fully one joint product. I dont have a picture of my product because i saved it but it didnt save for some reason.
Tuesday, November 2, 2010
Evaluation
Over the first 6 weeks being here at college in Mel's lessons we have been planning the desktop project, first we thought of our ideas made 4 different ideas on an A3 piece of paper and chose the one we thought was the best idea or design, I chose this one because it was by far the best idea i thought of and i love dragons so i decided to use it we then had to take a photo of the design and do a lot of tweaks to the design until you think its ready. the only thing i would change if i could is 2 of the rules are just going behind the taskbar and because i havent saved the final design in photoshop only in JPEG i cant change this.
Does the end product match your original intentions?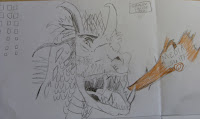
this is my original sketch of my idea this was before i uploaded it onto the computer, i drew it on paper then added a lot of things to it before it was finished i uploaded it to the computer then used many photo shop tools to colour this in and add my finishing touches, The finished product matches my original intentions i added a few other things like the fire, the colours and other things though.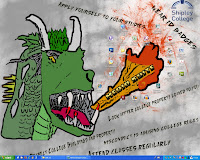
This is my finished project with everything added including the shipley college logo, media suite and the 6 rules we chose as a group that were most important to follow. I put the icons around the fire like an aura and used different brushes to make the smoke in the background and then another brush for the effects around the fire.
Was the end product appropriate for which audience it was intended to?
The end product was appropriate for who i intended it to be for i think, this was for both genders and ages 12 + in my opinion this fits that apart from the fact its probably more likeable for males than females, it isn't offensive in any way so it has no abusive or harmful content in it, the only bit of content is the blood on the teeth.
Discuss the technical aspects of your work and highlight the strengths / areas to develop Demonstrate your knowledge of the program [P.Shop/Flash/S.Mx] you used & include 'subject terminology' - did you use online tutorials? download fonts/brushes/textures - if so, say how you did this & why, what effect did this have on your work etc. What equipment did you use, d.camera, scanner, pencils, pastels etc.Discuss the content / style of your work - ideally this should relate to your research**
During creating my product i did a lot of work on it from drawing it which took quite a lot of time and concentration to everything i did in photo shop to make it better which i have explained earlier in this blog but also I used a filter, in artistic the poster edges to make it more comic book style because this is what i intended to do i changed my mind after photoshoping the project a bit because i decided it looks better as a comic book style.
Also I used fonts from 1001fonts to get my fonts i used in my project it had a good effect and made it less dull rather than just plain fonts, The equipment i used at first was a scanner but the quality wasn't good enough so i decided to use a camera from the library which was much better quality then i uploaded it using the memory card from the camera.
Did you encounter any problems when creating the product? If so how were they resolved?**What have you learnt from this experience?**What skills have been developed throughout this process?**Did you meet the deadline?**Did you have any problems with time management?
I encountered a few problems in photo shop like trying to make the neck longer but i decided it was fine as it is so besides that everything went fine, I have learnt from this experience a lot more photo shop skills. I just made the deadline but the time management was fine.
Does the end product match your original intentions?

this is my original sketch of my idea this was before i uploaded it onto the computer, i drew it on paper then added a lot of things to it before it was finished i uploaded it to the computer then used many photo shop tools to colour this in and add my finishing touches, The finished product matches my original intentions i added a few other things like the fire, the colours and other things though.

This is my finished project with everything added including the shipley college logo, media suite and the 6 rules we chose as a group that were most important to follow. I put the icons around the fire like an aura and used different brushes to make the smoke in the background and then another brush for the effects around the fire.
Was the end product appropriate for which audience it was intended to?
The end product was appropriate for who i intended it to be for i think, this was for both genders and ages 12 + in my opinion this fits that apart from the fact its probably more likeable for males than females, it isn't offensive in any way so it has no abusive or harmful content in it, the only bit of content is the blood on the teeth.
Discuss the technical aspects of your work and highlight the strengths / areas to develop Demonstrate your knowledge of the program [P.Shop/Flash/S.Mx] you used & include 'subject terminology' - did you use online tutorials? download fonts/brushes/textures - if so, say how you did this & why, what effect did this have on your work etc. What equipment did you use, d.camera, scanner, pencils, pastels etc.Discuss the content / style of your work - ideally this should relate to your research**
During creating my product i did a lot of work on it from drawing it which took quite a lot of time and concentration to everything i did in photo shop to make it better which i have explained earlier in this blog but also I used a filter, in artistic the poster edges to make it more comic book style because this is what i intended to do i changed my mind after photoshoping the project a bit because i decided it looks better as a comic book style.
Also I used fonts from 1001fonts to get my fonts i used in my project it had a good effect and made it less dull rather than just plain fonts, The equipment i used at first was a scanner but the quality wasn't good enough so i decided to use a camera from the library which was much better quality then i uploaded it using the memory card from the camera.
Did you encounter any problems when creating the product? If so how were they resolved?**What have you learnt from this experience?**What skills have been developed throughout this process?**Did you meet the deadline?**Did you have any problems with time management?
I encountered a few problems in photo shop like trying to make the neck longer but i decided it was fine as it is so besides that everything went fine, I have learnt from this experience a lot more photo shop skills. I just made the deadline but the time management was fine.
Wednesday, October 20, 2010
3D Max Name & Animation
Today in 3d max we have learned how to write our names in 3D and apply a large variety of textures, it was quite a simple thing to do, First of all you click the create button and instead of being on geometry you click on the shapes on the right of that, Then click on splines then text and write in the text you wish to put below.
When you have written the text you want to make it into a 3D text you must go on modify you then right click were it says text and convert into an editable mesh then click polygons and highlight the whole text then extrude as far as you want it to be to make it 3D then you can click the "m" key on your keyboard to go to material editor to change the colours of the text.
With the material editor I changed a lot of things with my text i went on to diffuse which is the colour you can change that and the specular level and glossiness to make the colour a bit better then you can click the little box next to the diffuse which is where you can change multiple things. there are various different styles to choose from i chose the planet button and played about with all the colours to get it to what i have now which i think is a very good text.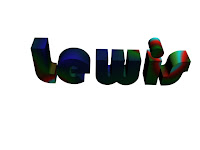
As you can see there are many different colours all mixed in this text in fact there are 8 different colours mixed into this and there all different shades/colours which gives it this effect i think its very fancy and my sort of style i only did two texts because i took alot of time doing this text to the best i could get it to my image.
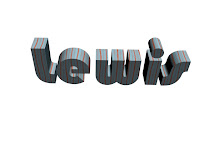
This text is a lot more simple i used the marble texture for this and then changed the vein width of this and made the lines thinner and more of them so its aqua with red lines through its simple but effective and i think its good.
After we did the text we learnt how to do animation you have to click auto key and highlight the object you want to move to make it animate so i made my text move around circle and go smaller and larger and made a simple animation then rendered this short seconds movie and saved it, Below is the video i made.
Then we did another animation which i made my car move and the ball bouncing as well as this to make two things in one animation the ball bounces off the car.
When you have written the text you want to make it into a 3D text you must go on modify you then right click were it says text and convert into an editable mesh then click polygons and highlight the whole text then extrude as far as you want it to be to make it 3D then you can click the "m" key on your keyboard to go to material editor to change the colours of the text.
With the material editor I changed a lot of things with my text i went on to diffuse which is the colour you can change that and the specular level and glossiness to make the colour a bit better then you can click the little box next to the diffuse which is where you can change multiple things. there are various different styles to choose from i chose the planet button and played about with all the colours to get it to what i have now which i think is a very good text.

As you can see there are many different colours all mixed in this text in fact there are 8 different colours mixed into this and there all different shades/colours which gives it this effect i think its very fancy and my sort of style i only did two texts because i took alot of time doing this text to the best i could get it to my image.

This text is a lot more simple i used the marble texture for this and then changed the vein width of this and made the lines thinner and more of them so its aqua with red lines through its simple but effective and i think its good.
After we did the text we learnt how to do animation you have to click auto key and highlight the object you want to move to make it animate so i made my text move around circle and go smaller and larger and made a simple animation then rendered this short seconds movie and saved it, Below is the video i made.
Then we did another animation which i made my car move and the ball bouncing as well as this to make two things in one animation the ball bounces off the car.
Tuesday, October 19, 2010
Finished Desktop Project

This is my finished desktop that ive done it took me a long time to get to this point i first drew the design of this dragon on paper the concept of it i then added the flames later on deciding it would be a good touch and add a little uniqueness to the design.
After this i shaded in the bits like the mouth shaded in the horns and neccisary bits, Then i photographed the piece of paper i drew on then transfered it to the computer and opened it on photoshop to tweek things on it.
I coloured it in in differant shades some brighter green whilst other bits duller whilst the flame being light orange to dark orange. the tongue is also purple and the teeth has red in the tips of some of the teeth which is meant to be blood, I found a decent brush on photoshop for the background smoke style and another sparks one around the flames.
I then made it poster edges made the thickness to the top and other things to make it more detailed and thicker edges and made it look alot more like a comic book style because i love this style, it looks amazing i like the style so i chose to make it look more like a comic book. I then got my fonts from 1001 fonts for the media suite which i placed into the flames of the dragon.
After this i got another font for all the college regulations, Then copied the shipley college logo and placed it under the dragon on the bottom left, placed the icons around the fire like an aura.
I think that my desktop project came out really good infact probably better than i thought it would i think its appropriate for the age and gender and has no offensive content in this and has nothing inappropriate.
Subscribe to:
Posts (Atom)